Connect a Particle Fleet to Blynk Without Per-Device Tokens
Connect Particle devices to Blynk without per-device auth tokens. One HTTP Data Converter and a naming convention let you scale from one device to a full fleet with zero firmware changes.
Published
August 11, 2026
Author
Henrik Holen
Getting data from a Particle device into Blynk used to mean a choice between two kinds of work: run the Blynk library on the device and manage a Blynk auth token in every unit's firmware, or hand-build a webhook pipeline and write parsing code for every field you send. Both approaches work for one device on a bench. Both get painful when you have fifty.
This article shows a third way, built on Blynk's HTTP Data Converters, a powerful feature of Blynk that is now available for all users. A Data Converter is a small JavaScript function that runs inside Blynk Cloud and turns whatever an external system sends (a webhook, a network server, a gateway) into first-class Blynk device data, reshaped and routed in a few lines of code you can change any time without touching a device. They're included on every plan, including Free.
Here, one converter carries the whole integration. The device firmware contains no Blynk code and no Blynk credentials at all. It just publishes a normal Particle Cloud event with a JSON payload. One Particle Integration forwards that event to one Blynk Data Converter, and a short, generic script routes the data to the right Blynk device and the right datastreams by convention. Adding device number two (or two thousand) requires no new firmware, no new webhook, and no new converter code.
Before: per-device auth tokens compiled into firmware, or a custom webhook plus per-field parsing code on the receiving end.
After: identical firmware on every device, one integration, one converter, and a single metadata field that links each Particle device to its Blynk twin.
Everything below is based on a working example: the firmware lives at anthony-blynk/Blynk-Particle-Example and was tested on a Particle M-SoM (M524), but the approach works with any Particle device with Particle Cloud connectivity, Wi-Fi or cellular.
Option A: the Blynk library on the device. You add the Blynk library to your firmware, and the device opens its own connection to Blynk Cloud alongside its Particle Cloud connection. That works, and it's the route to take when you need two-way control. But every device now needs its own Blynk auth token provisioned into it: either compiled in, stored in EEPROM, or delivered through some provisioning step you have to build. You are also running two cloud connections over one link, and you have Blynk-specific code woven through your firmware.
Option B: hand-built webhooks against the Blynk HTTP API. You publish Particle events, create a webhook per value (or a webhook with a hand-written body template), and target Blynk's device HTTP API. Now the Blynk auth token lives in the webhook URL, so you need a webhook per device, or a scheme for smuggling per-device tokens through the pipeline. Every new field means editing webhook templates. Every new device means touching the Particle console again.
Both options tie something per-device (a token) or per-field (parsing/mapping code) into places that are expensive to change at scale. The approach below removes both couplings.
2. The new approach at a glance
The pipeline: device publish → Particle Cloud → one webhook → Blynk HTTP Data Converter → template datastreams.
The pipeline at a glance
The device publishes a JSON payload as an ordinary Particle Cloud event. A single Particle Integration (a webhook) forwards that event, wrapped in Particle's standard JSON envelope, to a Blynk HTTP Data Converter, a small JavaScript function that runs inside Blynk Cloud. The converter figures out which Blynk device the data belongs to and writes each JSON field to the datastream of the same name.
Three naming conventions carry the whole design. It is worth internalizing them before touching any console:
The Blynk Template name names everything. The Particle integration is named after the template, the event it listens for is <template-name>/data, JSON payload keys are datastream names, and a ParticleDeviceId metadata field ties each Particle device to its Blynk twin.
The template name drives the Particle side. The Particle Integration's name is the Blynk Template name, and its event name is <Template Name>/data. In this example that means integration blynk-particle-example listening for blynk-particle-example/data. The firmware follows the same rule, building its event name as BLYNK_TEMPLATE_NAME "/data", which is what lets the firmware and the Data Converter work together with no further coordination. Using the slugified Blynk Template name (rather than the Template ID) means an event seen in the Particle console is instantly traceable to the Blynk template it feeds, and the same firmware works across Dev/QA/Prod Blynk environments, where the template name is shared but the ID differs.
JSON keys are datastream names. The payload {"temperature":24.3,"humidity":55.1,"uptime":120} updates the Blynk datastreams named temperature, humidity, and uptime. The converter loops over whatever keys arrive, so adding a field to the payload plus a matching datastream to the template is the entire change. No converter edits.
A `ParticleDeviceId` metadata field ties a Particle device to a Blynk device. Every Particle webhook request includes the publishing device's Device ID (the coreid field). The converter authenticates by matching that ID against a Blynk device metadata field named ParticleDeviceId. No Blynk auth token ever touches the device or the webhook.
Note the direction of travel: this example is uplink only (device to Blynk). There is no downlink/control path in the firmware (no Particle.function() handlers and no Particle.subscribe()), so dashboard widgets that write values will not reach the device with this setup alone. For downlink control, Blynk's existing Particle control guide covers the Cloud Functions route.
3. Prerequisites
A Particle device, claimed to your account and connected to the Particle Cloud. This walkthrough used an M-SoM (M524), but any Particle device with Particle Cloud connectivity works, Wi-Fi or cellular.
A Particle console account with access to Integrations.
A Blynk Console account. Data Converters are available on every Blynk plan, including Free.
The example firmware: anthony-blynk/Blynk-Particle-Example, plus Particle Workbench or the Web IDE to flash it.
4. Step 1: The Blynk Template (datastreams and naming)
In the Blynk Console, create (or open) a Device Template. The example uses a template whose slugified name is blynk-particle-example. Remember that the slugified template name feeds directly into the Particle event name, so pick it deliberately.
Avoid template names starting with `particle` or `spark`. Particle reserves event names beginning with those words (case-insensitive), and in our testing events using them get silently dropped: Particle.publish() still returns true on the device, but the event never reaches your event stream in the Particle console.
The template needs two things:
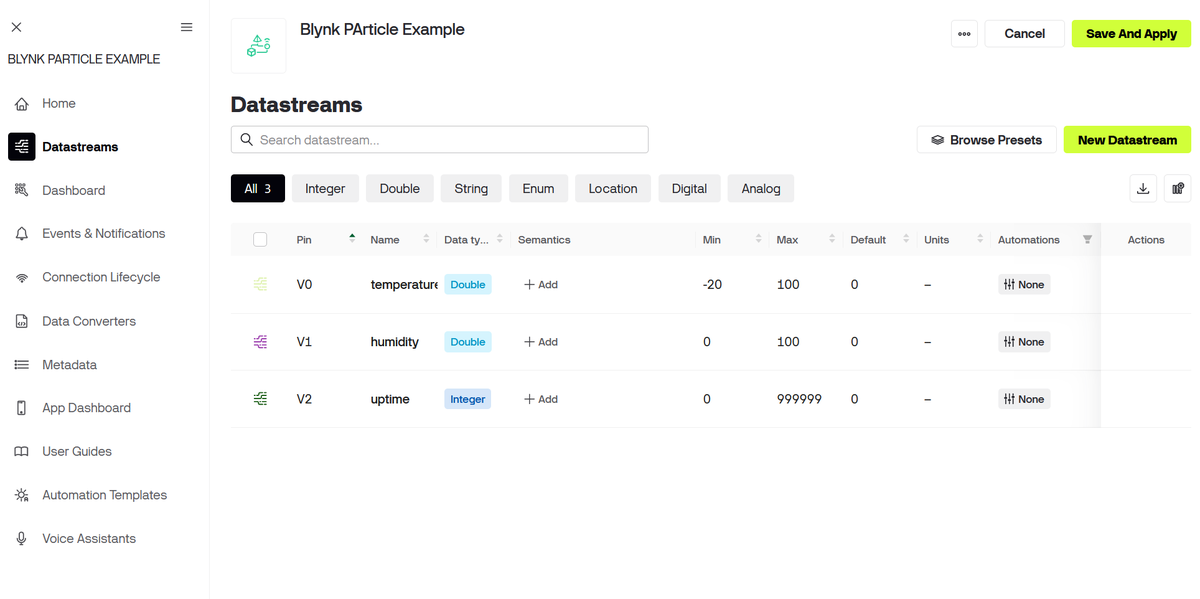
Datastreams matching the payload keys. The example firmware publishes three fields, so the template needs three datastreams whose names match the JSON keys exactly (names are case-sensitive). This is the working template's actual datastream configuration:
Virtual pin
Name
Data type
Min
Max
V0
temperature
Double
-20
100
V1
humidity
Double
0
100
V2
uptime
Integer
0
999999
Each datastream sits on a virtual pin (V0–V2) as usual, but the pins are incidental here: the converter addresses datastreams by name, so the names (temperature, humidity, uptime) are what must exactly match the JSON keys the firmware publishes. Pick min/max ranges that cover your real sensor values; the ones above bound the example's dummy data comfortably.
The example template's Datastreams tab: temperature, humidity, and uptime on V0-V2
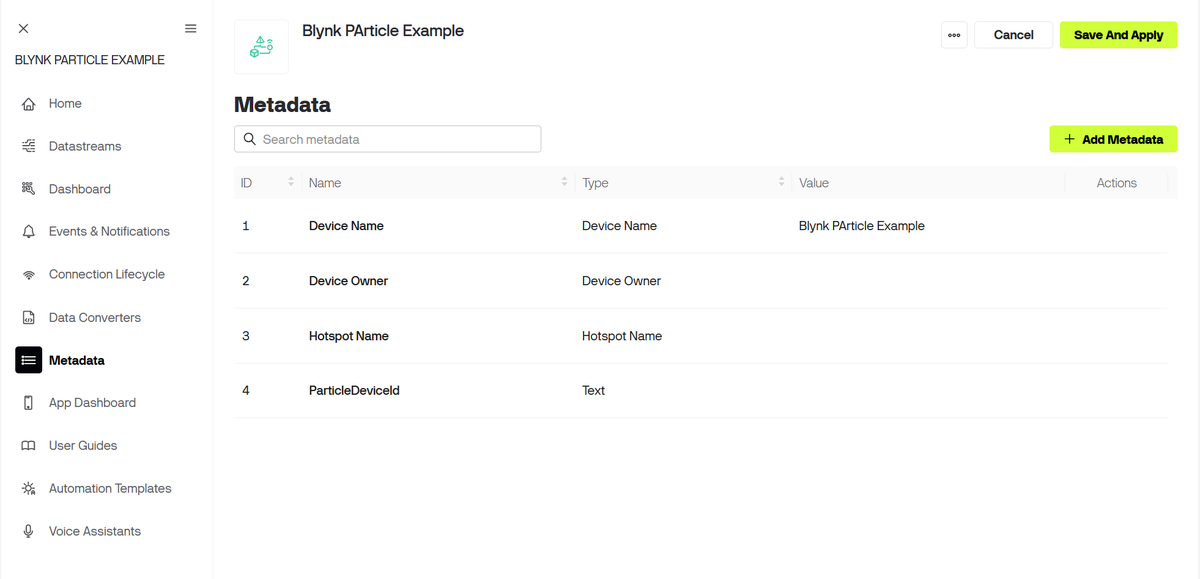
A `ParticleDeviceId` metadata field. This is a required template setup step, not an optional extra: in the template's Metadata tab, create a new field named ParticleDeviceId of type Text. The converter's handler.useAuthMetaField("ParticleDeviceId") call (Step 2) matches incoming requests against this field, so the field name must match that string exactly, character for character. (Metadata-based converter authentication supports the Text, Device Name, ICCID, IMEI, and Number types; Text is the right fit here.) For every Blynk device created from this template, you will set this field to the corresponding Particle device's Device ID: the 24-character hex ID shown in the Particle console or printed on the Particle device itself.
Finally, create one Blynk device from the template for your first Particle device, open its device page, and paste the Particle Device ID into its ParticleDeviceId metadata field.
The template's Metadata tab with the custom ParticleDeviceId field of type Text
5. Step 2: The Blynk HTTP Data Converter
Still inside the template, open Data Converters and create a new HTTP converter. Blynk gives the converter an endpoint URL of the form:
https://fra1.blynk.cloud/converter/<CONVERTER_ID>
(The region prefix, fra1 here, depends on which Blynk region your account lives in; use the URL exactly as the console issues it.) Treat this URL as a secret. Anyone who has it, plus a known Particle Device ID, could push data into your datastreams. Don't commit it to a public repo or paste it into screenshots.
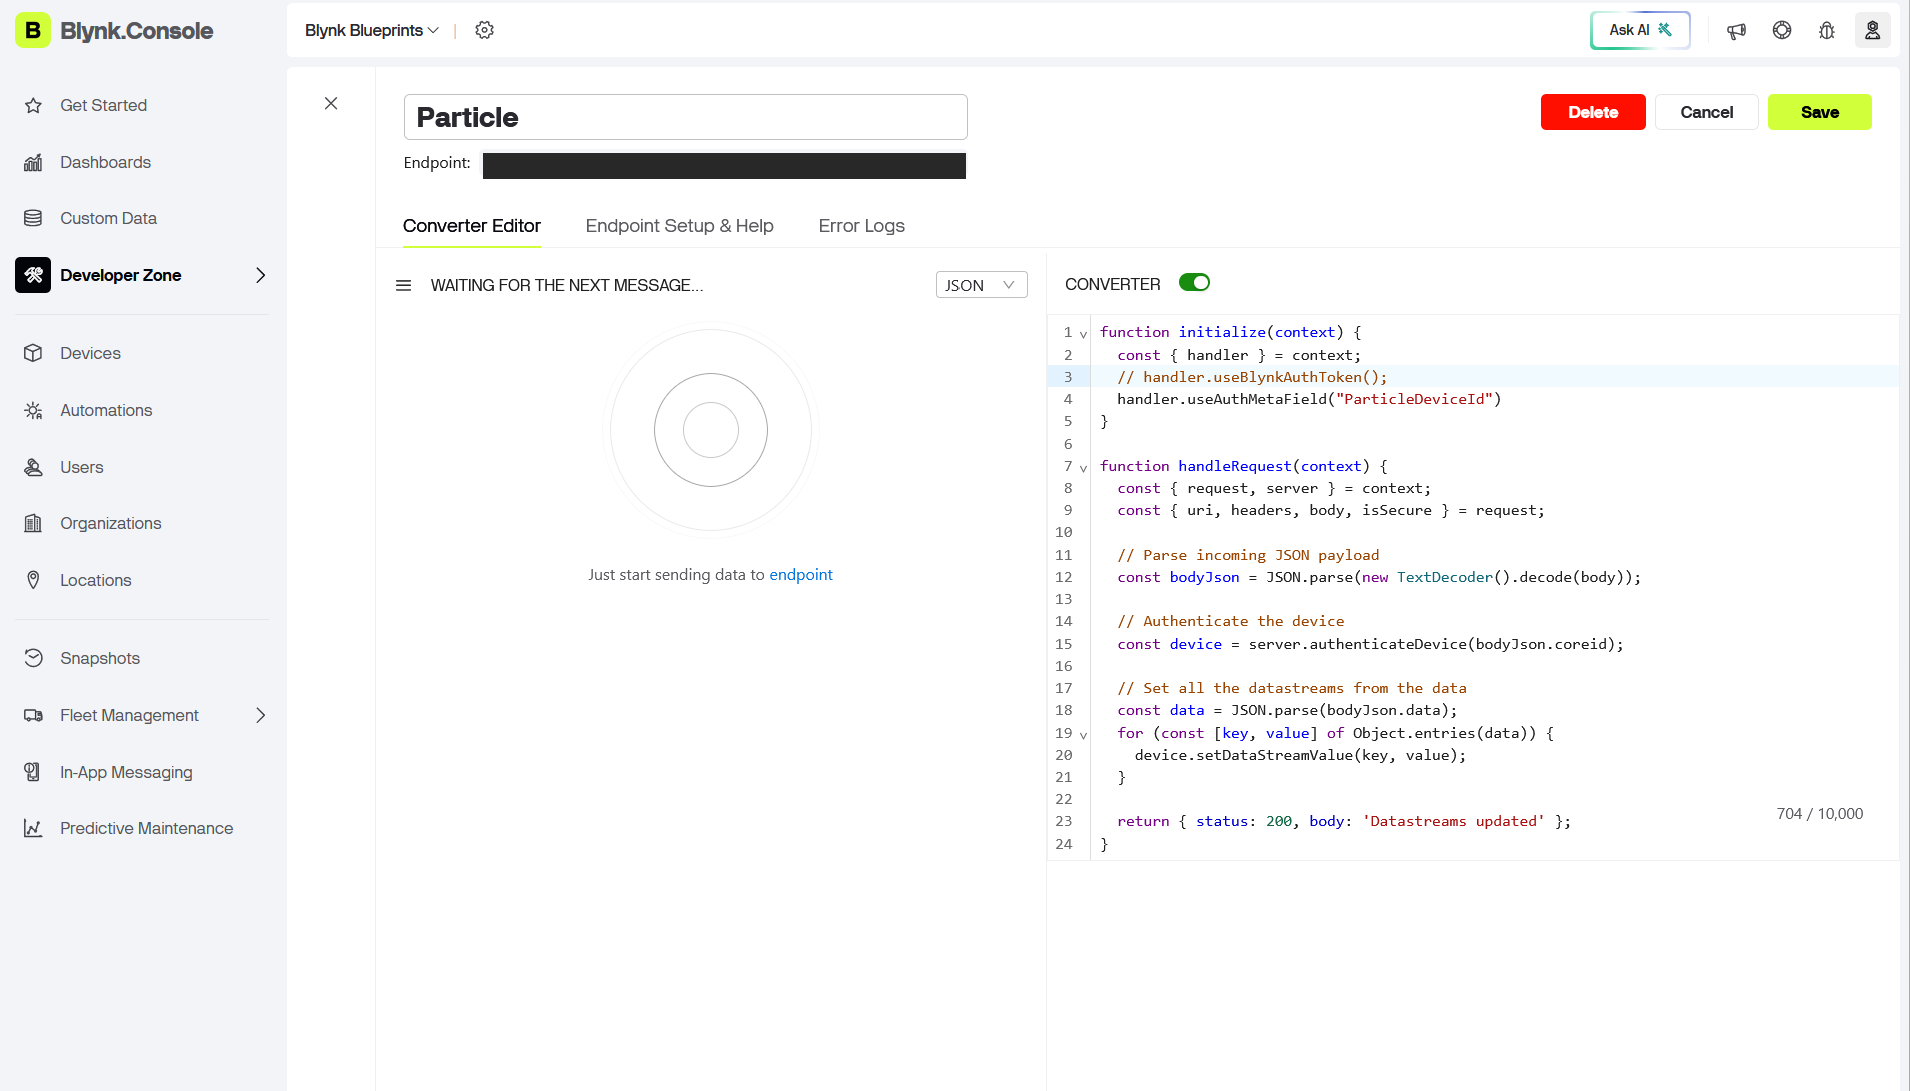
The converter script is short enough to read in one sitting. Here it is in full (it also lives in the example repo's README):
JavaScript
functioninitialize(context) {
const { handler } = context;
// handler.useBlynkAuthToken();
handler.useAuthMetaField("ParticleDeviceId")
}
functionhandleRequest(context) {
const { request, server } = context;
const { uri, headers, body, isSecure } = request;
// Parse incoming JSON payloadconst bodyJson = JSON.parse(new TextDecoder().decode(body));
// Authenticate the deviceconst device = server.authenticateDevice(bodyJson.coreid);
// Set all the datastreams from the dataconst data = JSON.parse(bodyJson.data);
for (const [key, value] of Object.entries(data)) {
device.setDataStreamValue(key, value);
}
return { status: 200, body: 'Datastreams updated' };
}
Walking through it:
initialize(context) runs once to configure how the converter authenticates devices. There are two options: handler.useBlynkAuthToken() (each request must carry a Blynk auth token, the thing we are trying to avoid) or handler.useAuthMetaField("ParticleDeviceId"), which tells Blynk to identify devices by matching a value from the request against each device's ParticleDeviceId metadata field. The commented-out line documents the road not taken.
handleRequest(context) runs for every incoming HTTP request. It destructures the raw request (URI, headers, body bytes, TLS flag) and the server API object.
Decoding the envelope. The request body arrives as bytes; new TextDecoder().decode(body) turns it into a string, and JSON.parse yields Particle's standard webhook envelope. By default, a Particle webhook with JSON format sends four fields: event (the event name), data (the published payload, as a string), published_at (an ISO-8601 timestamp), and coreid (the Device ID of the publishing device).
server.authenticateDevice(bodyJson.coreid) is where the routing happens. Blynk looks for a device whose ParticleDeviceId metadata field equals the incoming coreid and returns a handle to that device. This is the line that makes the whole setup zero-config per device: the identity travels for free in every webhook request.
The double parse. Because Particle delivers the published payload as a string inside the envelope, bodyJson.data needs its own JSON.parse to become an object. This is the firmware's {"temperature":...,"humidity":...,"uptime":...} payload.
The generic fan-out. Object.entries(data) iterates every key/value pair and calls device.setDataStreamValue(key, value) for each one. The key is used as the datastream name, which is why payload keys and datastream names must match. There is no per-field code, so the converter never needs editing when the payload grows. (One documented limit to know about: setDataStreamValue accepts string values up to 1024 characters.)
The response, { status: 200, body: 'Datastreams updated' }, is what Particle's webhook sees, and it shows up in the Particle integration logs, which makes debugging pleasantly symmetrical: you can watch the same request from both ends.
Two more documented limits worth knowing before you design around converters: a template can hold at most two HTTP converters, and ParticleDeviceId values must be unique across devices. If two devices share a metafield value, only one gets matched and the behavior is undefined.
Paste the script into the converter editor, save, and copy the converter URL for the next step.
The HTTP Data Converter editor with the full script (endpoint URL redacted)
6. Step 3: The Particle Integration
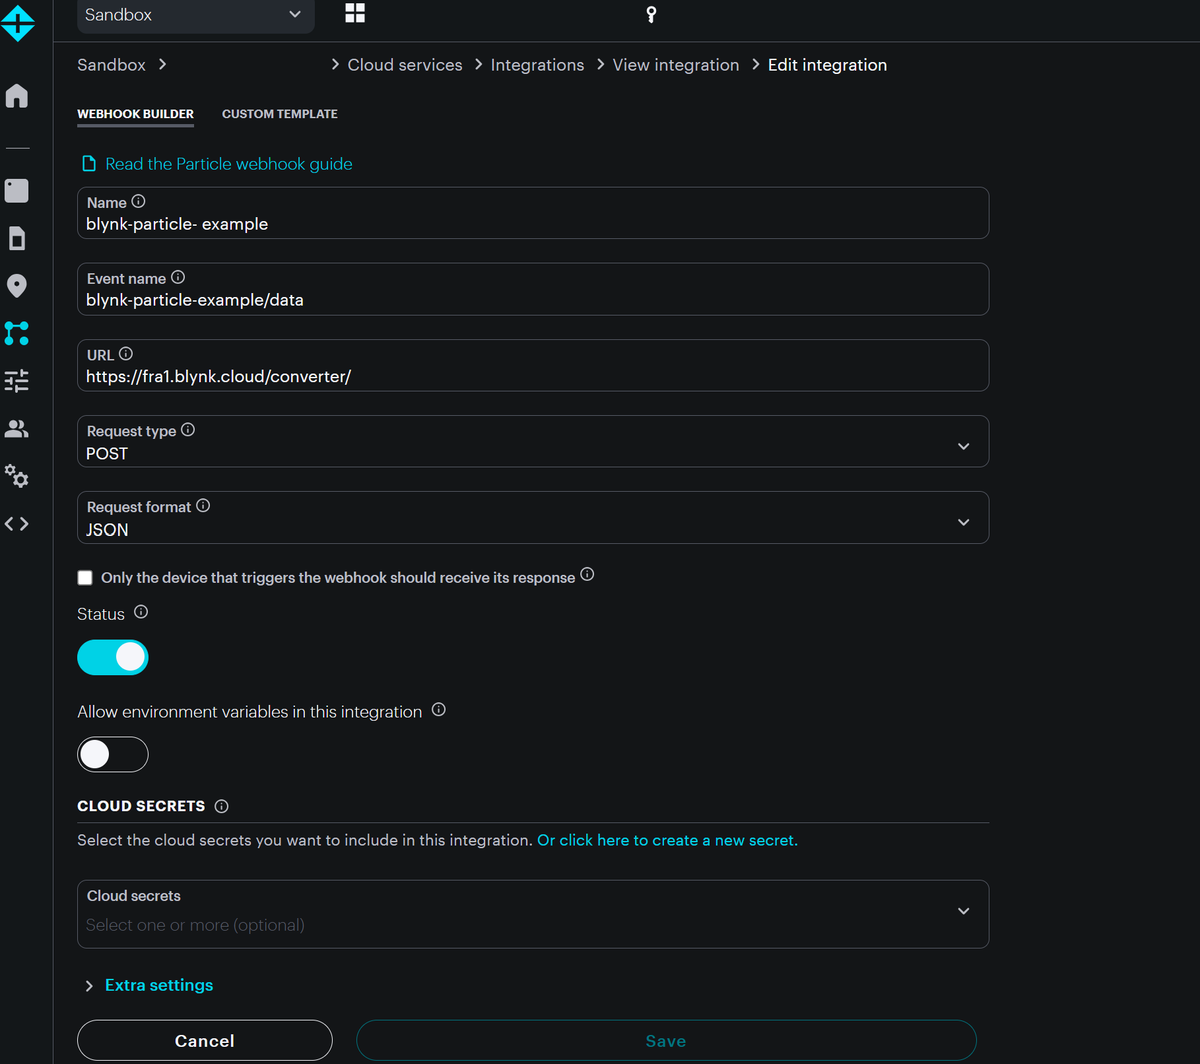
In the Particle console, go to Integrations → New Integration → Webhook, and set four things:
Field
What to enter
Example
Name
The Blynk Template Name
blynk-particle-example
Event Name
<Template Name>/data
blynk-particle-example/data
URL
Your Data Converter's URL (from Step 2)
https://fra1.blynk.cloud/converter/<CONVERTER_ID>
Request Type / Format
POST, JSON
The Name and Event Name follow the convention from Section 2: the integration is named after the Blynk Template, and the event it listens for is that name plus /data. Because the firmware builds its event name the same way, this is what makes the firmware and the Data Converter work together with no further coordination.
Set Request Format to JSON explicitly rather than trusting defaults: Particle's API default for a bare webhook is form-encoded, and the converter expects JSON. Everything else can be left alone.
The Particle webhook configuration: Name, Event Name, converter URL (redacted), Request Type POST, Request Format JSON
One Particle detail worth knowing: the webhook's Event Name is a prefix filter, and it's case-sensitive. A webhook listening on blynk-particle-example/data also fires for blynk-particle-example/data-v2. That's harmless here, but it is a reason to keep event names unambiguous as your product grows, and another reason the <template-name>/data convention is useful, since each template's events land under a clean, distinct prefix.
7. Step 4: The device firmware
The full firmware is a single file, src/Blynk-Particle-Example.cpp, and contains not one line of Blynk-specific code. The interesting parts:
The naming convention, in code. The event name is built from the slugified Blynk template name, so the firmware's only "configuration" is one #define:
C++
// Slugified Blynk Template Name (lowercase, hyphenated - no spaces/punctuation).#defineBLYNK_TEMPLATE_NAME"blynk-particle-example"constchar* EVENT_NAME = BLYNK_TEMPLATE_NAME "/data";
constunsignedlong PUBLISH_INTERVAL_MS = 30000;
To adapt the example to your own template, changing BLYNK_TEMPLATE_NAME is the only edit required.
A standard Particle loop. The device runs in SYSTEM_MODE(AUTOMATIC) (ordinary Particle Cloud connectivity, nothing special) and publishes on a 30-second timer.
The publish. Sensor readings (dummy random values in the example; swap in your real sensors) are formatted into a small JSON string and published as a private Particle event:
That's the entire integration surface on the device: build JSON whose keys are your datastream names, publish it to <template-name>/data, done. Note what is absent: no Blynk library, no auth token, no per-device configuration of any kind. The same firmware runs on every device in the fleet.
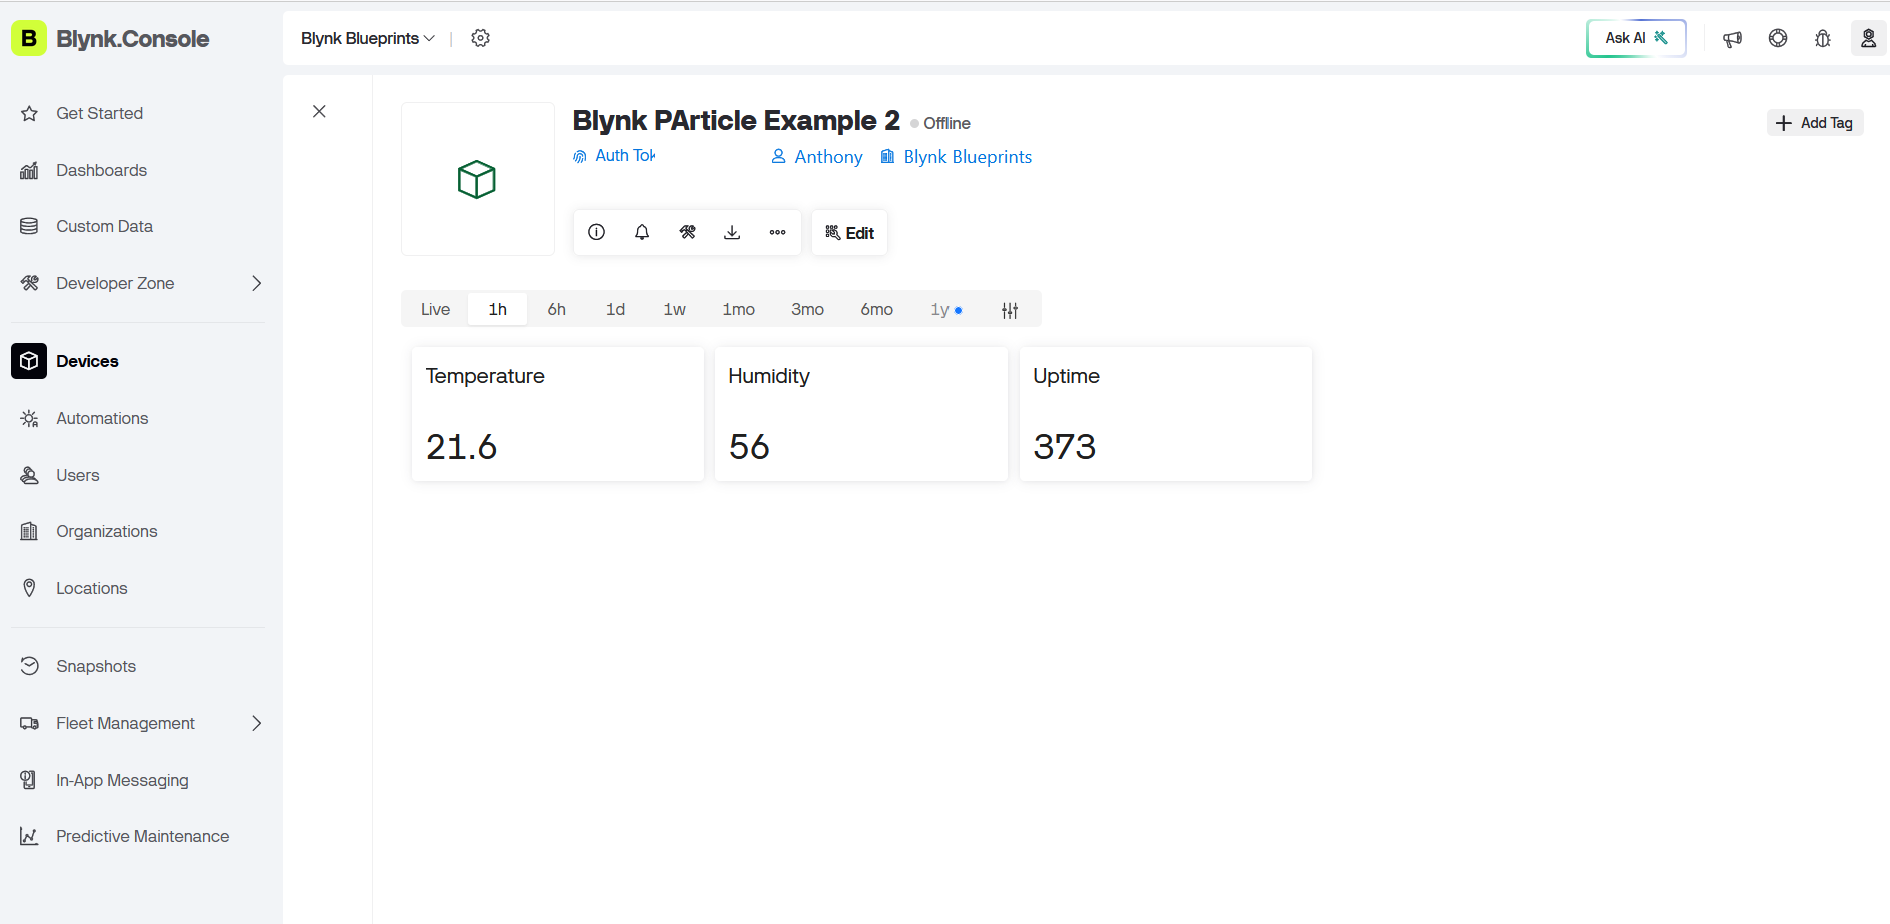
Flash it (the example was built for and tested on an M-SoM M524; any Particle platform works with the appropriate target), open your Blynk device's dashboard in the Console or in Blynk's native iOS and Android apps, and within 30 seconds the temperature, humidity, and uptime datastreams start updating.
The device dashboard with temperature, humidity, and uptime populated by the converter
8. From first device to fleet
Here is the payoff. When device number two arrives, what changes?
Firmware: nothing. Every device runs the identical firmware; there is no token or ID compiled in.
Particle side: nothing. The one webhook fires for every device (within its scope: your Sandbox account or your Product) that publishes the event; coreid in the envelope tells the converter who is who.
Blynk side: create a device from the template and set its ParticleDeviceId metadata field to the new unit's Particle Device ID. That is the entire per-device step.
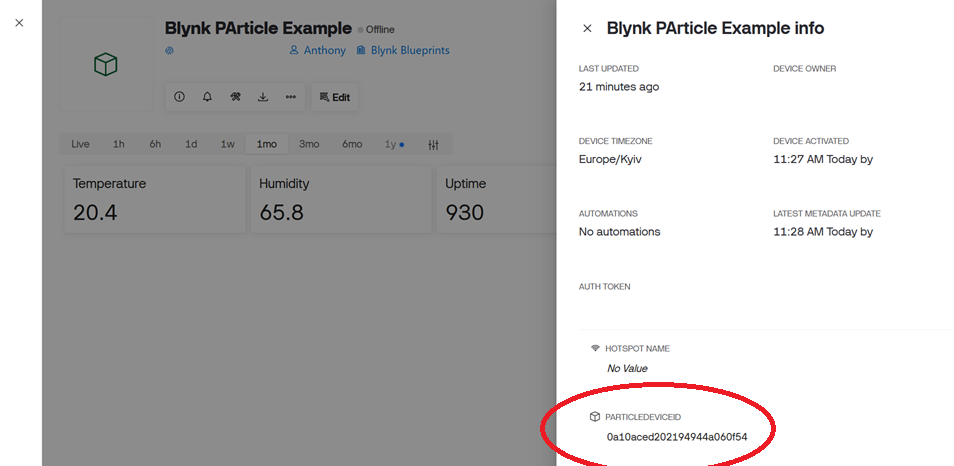
For a one-off device (prototyping or bench testing), the flow is entirely manual and quick: in the Blynk Console, create a device from the Template, then open the device and set its ParticleDeviceId metadata field to the Particle device's actual Device ID (shown in the Particle console, or printed by particle identify). From the next publish onward, the converter routes that device's data to its dashboard.
The Blynk device info panel with ParticleDeviceId set to the Particle device's Device ID
For mass production, the same mapping is set in bulk instead of by hand, using Blynk's static tokens bulk-import flow. Where the prototype step was "type one Device ID into one metadata field," the production step is "upload a CSV of all of them":
Collect your Particle Device IDs into a one-column CSV file. For a production run these come straight from the Particle purchase manifest, so there is nothing to transcribe: one Device ID per row.
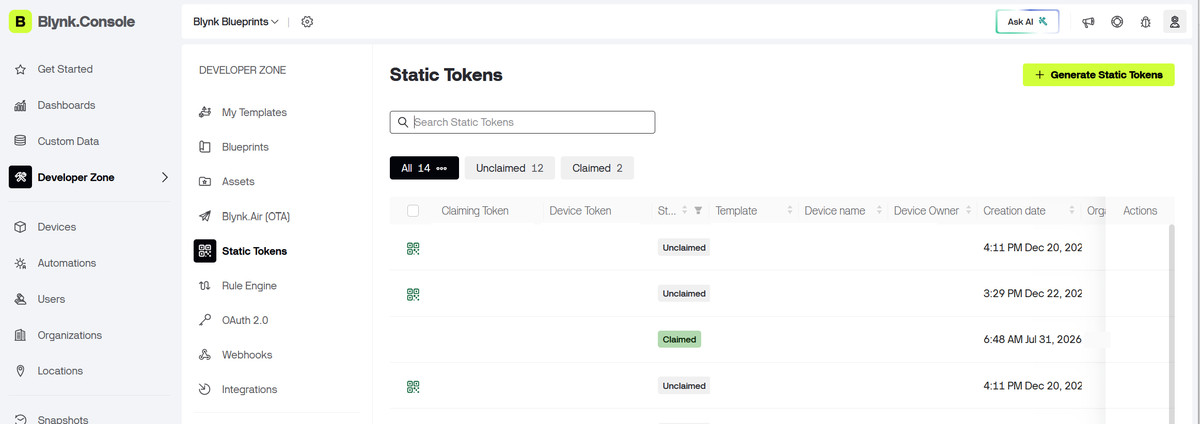
In the Blynk Console, go to Developer Zone → Static Tokens and choose Create Static Tokens From File.
Developer Zone → Static Tokens in the Blynk Console
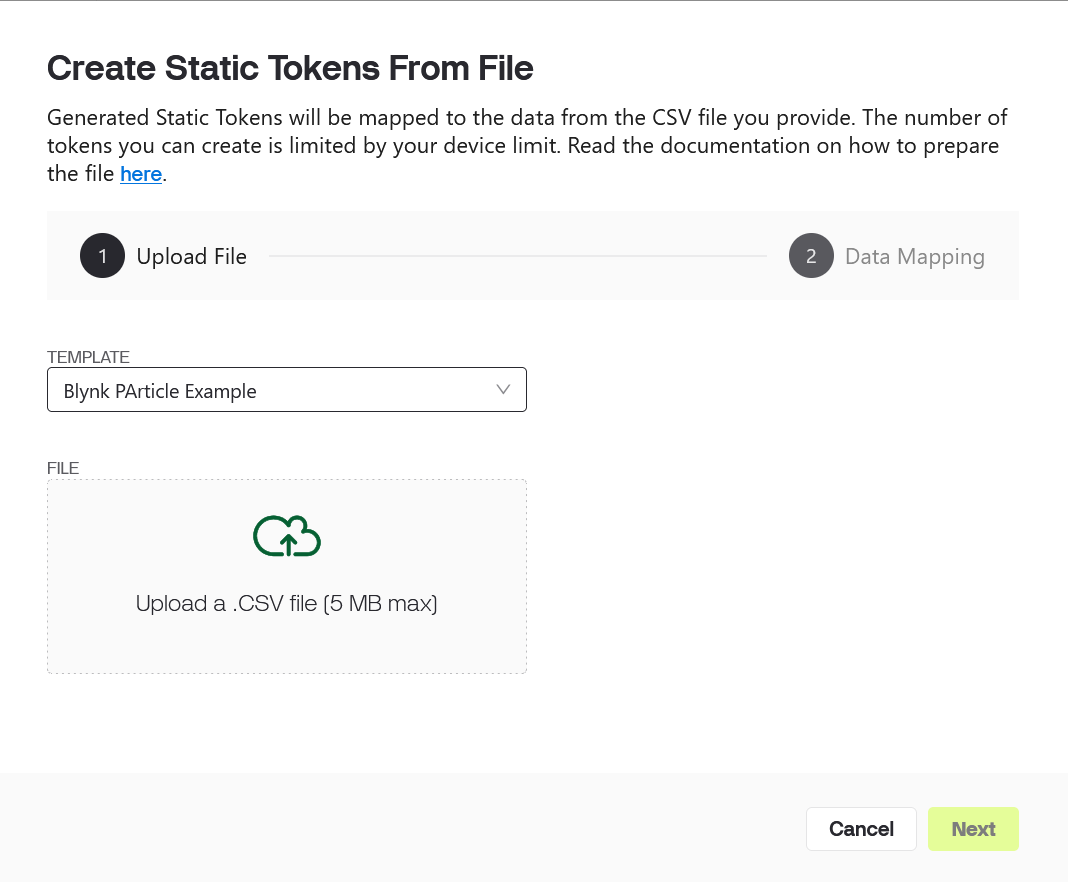
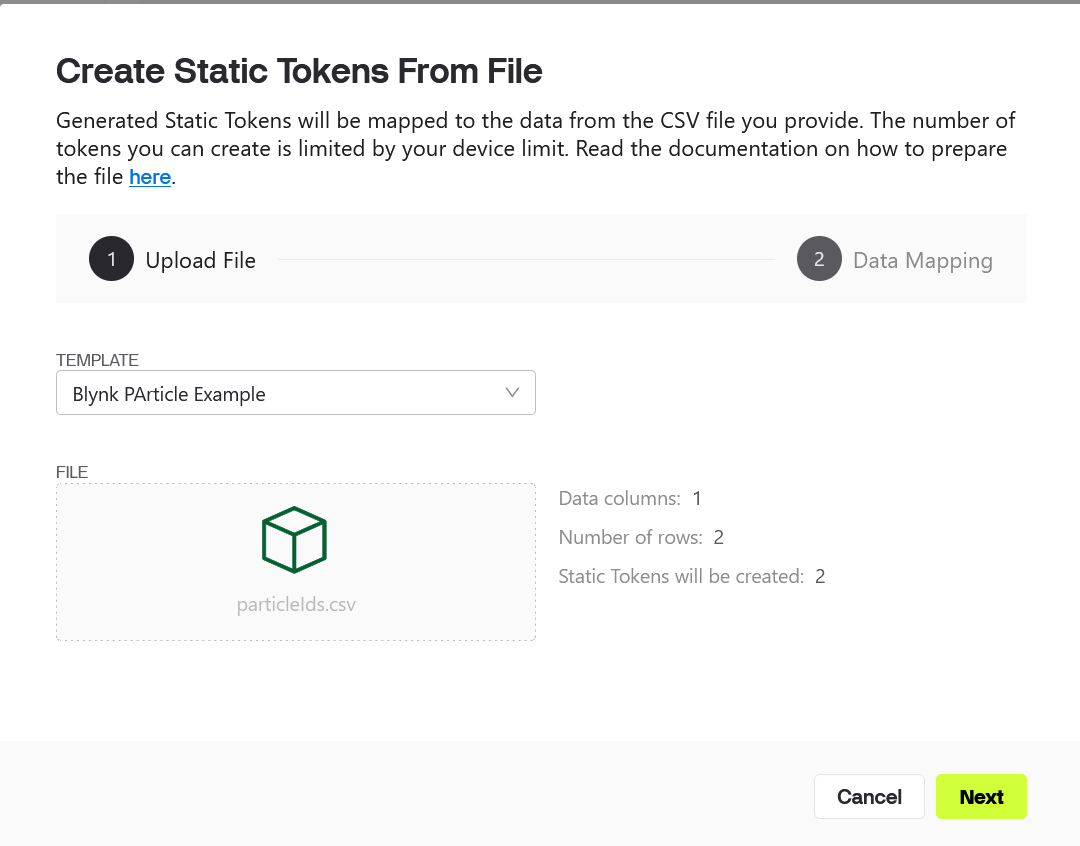
Select your Template and upload the CSV. The dialog previews the data columns and row count and shows how many static tokens will be created, one per row.
Create Static Tokens From File: choosing the template and uploading the CSV
The uploaded CSV previewed: data columns, row count, and tokens to be created
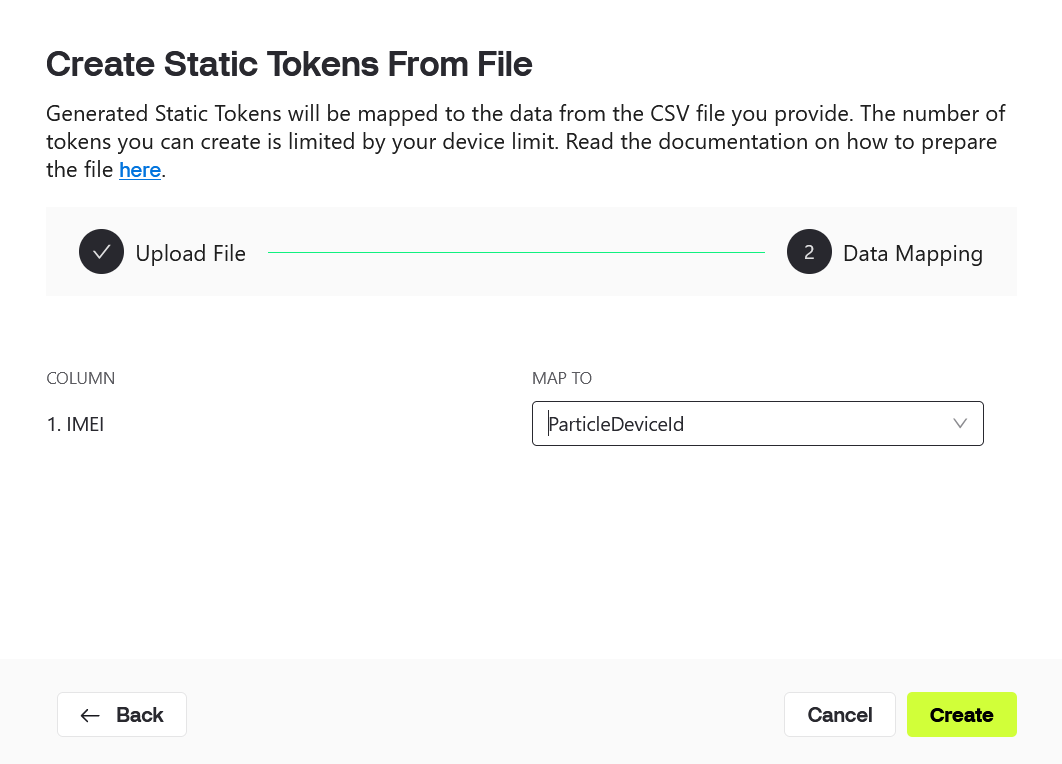
In the Data Mapping step, map the CSV column to the `ParticleDeviceId` metadata field and click Create.
The Data Mapping step: the CSV column mapped to the ParticleDeviceId metadata field
Blynk generates a ZIP file for you to download, containing a QR-code token image for each static token, one QR per row of your CSV. Print each QR code and attach it to the corresponding device at manufacturing or kitting time.
The end user scans the QR code with the Blynk app to claim the device (or with your own white-label app on the Enterprise plan). That scan binds the device to its owner's Blynk account. Every token starts out Unclaimed and flips to Claimed the moment a user scans its QR, so the web console shows exactly how much of a production run has reached real users.
Blynk pre-creates a static token per device with the ParticleDeviceId metadata already populated, so every device from the production run is recognized by the converter the first time it publishes, and handed to its owner with nothing more than a scan. That closes the loop on the article's promise: prototype provisioning is one manual metadata entry, production provisioning is one CSV upload plus a printed QR per unit. In both cases the devices ship with the exact same firmware as the bench prototype, because the pairing lives entirely in Blynk metadata, never in the device.
9. Troubleshooting
The pipeline has exactly three hops, and each has its own log:
Device: the firmware logs every publish over USB serial (particle serial monitor), including failures. Remember the reserved-prefix trap: events named spark... or particle... are silently dropped even though Particle.publish() returns true.
Particle Integration: the webhook's page in the Particle console shows recent triggers and the response each one received. A healthy request shows the converter's 200 Datastreams updated response; errors from Blynk surface here too.
Blynk Data Converter: the converter's log view in the Blynk Console shows what the script received and how it processed it: the first place to look when data leaves Particle but never reaches a datastream.
Common failure modes, in the order they usually bite:
Symptom
Likely cause
Nothing in the Particle event stream
Event name starts with a reserved prefix (spark/particle), or the device is offline
Event visible, webhook never fires
Event Name in the integration doesn't match (it's a prefix match; check for typos)
Webhook fires, converter returns an error
ParticleDeviceId metadata field missing, empty, or not matching the device's coreid
Converter returns 200 but a value never appears
Datastream name doesn't exactly match the JSON key (case-sensitive), or doesn't exist on the template
Two devices' data interleaving on one dashboard
Duplicate ParticleDeviceId values; each must be unique, or matching behavior is undefined
Values look wrong
Payload formatting on the device; check the serial log for the exact JSON published
Wrap-up
The pattern is small enough to summarize in a sentence: devices publish plain Particle events whose payload keys are Blynk datastream names; one webhook and one twenty-line converter route everything, and a ParticleDeviceId metadata field is the only per-device configuration in the system. It keeps Blynk out of your firmware, keeps credentials out of your devices, and keeps fleet growth from generating console work.
Nothing in the converter is Particle-specific beyond the envelope parsing, either: the same pattern works for any source that can POST JSON, from a LoRaWAN network server to an ESP32 posting readings over HTTP. And when you outgrow uplink-only, the same template and datastreams work with Blynk's documented Particle control route for sending commands back down.
Clone the example, swap the dummy random() readings for your sensors, and you have a production-shaped pipeline in an afternoon. If you're new to Blynk, start free; the entire pipeline in this tutorial costs nothing to try.
Sign up for a newsletter
Get latest news from Blynk
Over 500,000 people already signed up our newsletter. We never spam.
Thank you! Your submission has been received.
Oops! Something went wrong while submitting the form.







.png)